NOTE:
Use specified grease.
AC side:
Olistamoly (Part No. 28395SA030)
AARi side:
ONE LOUVER C (Part No. 28395SA000)
1. Set AC boot and small boot band on the AC side of shaft.
CAUTION:
Be sure to wrap shaft splines with vinyl tape to protect the boot from scratches.
2. Place the drive shaft between wooden blocks and secure it with a vise.
CAUTION:
Do not set the drive shaft on a vise directly. Be sure to use wooden blocks.
3. Apply a thin coat of specified grease [80 to 85 g (2.82 to 3.0 oz)] to the AC.
4. Apply an even coat of the specified grease [20 to 30 g (0.71 to 1.06 oz)] to the entire inner surface of boot. Also apply grease to the shaft.
NOTE:
The inside of the larger end of AC boot and the boot groove is to be cleaned so as to be free from grease and other foreign matter.
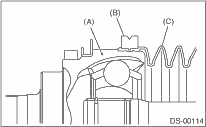
5. Attach the boot protrusion on AC boot groove.
|
(A) |
AC |
|
(B) |
Large boot band |
|
(C) |
Boot |
6. Temporarily wrap the large boot band above the AC boot groove.
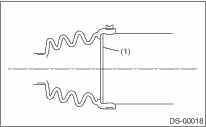
7. Check the position of the retainer.
|
(1) |
Retainer |
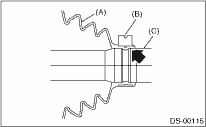
8. Attach the boot protrusion on the shaft groove.
|
(A) |
Boot |
|
(B) |
Small boot band |
|
(C) |
Shaft |
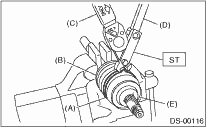
9. Tighten the boot bands using ST, torque wrench and socket flex handle.
| ST 28099AC000 | BOOT BAND PLIER |
|
(A) |
Large boot band |
|
(B) |
Boot |
|
(C) |
Torque wrench |
|
(D) |
Socket flex handle |
|
(E) |
AC |
Clearance at the crimped section of the boot band:
Large boot band
1.3 mm (0.051 in) or more
Small boot band
1.3 mm (0.051 in) or more
10. Pass the AARi boot and the retainer through the shaft and place at the center.
11. Align alignment marks and install the trunnion on the shaft.
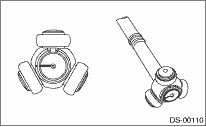
12. Fill 100 to 110 g (3.53 to 3.88 oz) of specified grease into the interior of AARi outer race.
13. Apply a thin coat of specified grease to the free ring and trunnion.
14. Align the alignment marks of the shaft and outer race, and install the outer race.
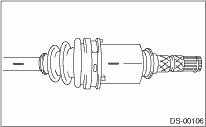
15. Apply an even coat of the specified grease 30 to 40 g (1.06 to 1.41 oz) to the entire inner surface of boot.
16. Install the AARi boot taking care not to twist it.
CAUTION:
• The inside of the larger end of the AARi boot and the boot groove is to be cleaned so as to be free of grease and other foreign matter.
• When installing the AARi boot, position the outer race of the AARi at the center of the stroke.
17. Install the new large boot band and small boot band at the required positions.
18. Tighten the boot bands using ST, torque wrench and socket flex handle.
| ST 28099AC000 | BOOT BAND PLIER |
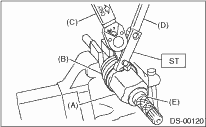
|
(A) |
Large boot band |
|
(B) |
Boot |
|
(C) |
Torque wrench |
|
(D) |
Socket flex handle |
|
(E) |
AARi |
Clearance at the crimped section of the boot band:
Large boot band
1 mm (0.04 in) or less
Small boot band
1 mm (0.04 in) or less
19. Extend and retract the AARi repeatedly to ensure an equal grease coating.