1. Disconnect the ground cable from the battery.
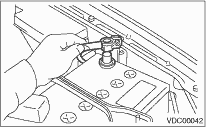
2. Remove the air intake duct from engine room to make it easier to remove the VDCH/U.
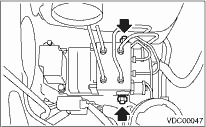
3. Disconnect the connector from VDCH/U.
CAUTION:
Be careful to keep water and other foreign materials from coming into contact with the VDCH/U terminals.
4. Remove the cable clip.
5. Remove the brake pipes from the VDCH/U.
CAUTION:
Wrap the brake pipe in a vinyl bag so that brake fluid does not splash on the vehicle body.
6. Remove the ground wire of the VDCH/U.
7. Remove the two bolts which hold the VDCH/U, then remove the VDCH/U from the engine room.
CAUTION:
• The VDCH/U is not to be disassembled. Do not attempt to loosen the bolts and nuts.
• Do not drop or bump the VDCH/U.
• Do not turn VDCH/U upside down or place it sideways.
• Be careful to prevent foreign particles from getting into the VDCH/U.
• After installing the new VDCH/U, tighten the bracket bolts then apply rust-proofing wax (Nippeco LT or GB) to the bracket bolts.
• Do not pull on the harness when disconnecting the harness connector.
1. Disconnect the ground cable from the battery.
2. Remove the air intake duct from engine room to make it easier to remove the relay box.
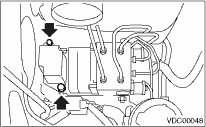
3. Disconnect the connector from relay box.
4. Remove the cable clip.
5. Remove the bolts which secure the relay box, and remove the relay box and connector bracket.
CAUTION:
Do not drop or bump the relay box.