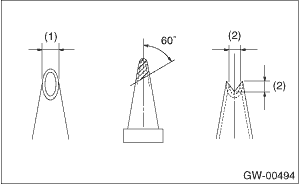
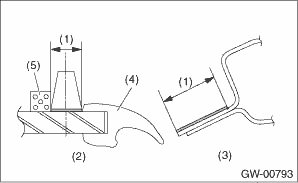
1. Cut the cartridge nozzle tip as shown in the figure, and set the adhesive in the sealant gun.
|
(1) |
10 mm (0.39 in) |
|
(2) |
8 mm (0.31 in) |
2. Clean the external circumference of windshield glass with alcohol or white gasoline.
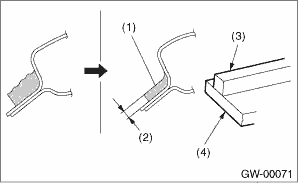
3. Remove the adhesive layer on the body using cutter knife to obtain smooth face of 2 mm (0.08 in) thick.
CAUTION:
Be careful not to damage the body and paint surface.
|
(1) |
Adhesive |
|
(2) |
2 mm (0.08 in) |
|
(3) |
Dam rubber |
|
(4) |
Glass |
4. Clean the body with alcohol or white gasoline to eliminate cutting powder, dust and dirt completely from body.
5. Install the dam rubber.
|
(1) |
Locating pin |
|
(2) |
Dam rubber |
|
(3) |
11 mm (0.43 in) |
|
(4) |
13.5 mm (0.53 in) |
6. Attach the molding to the glass.
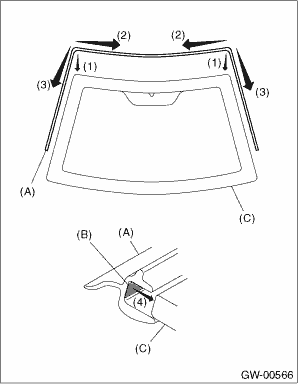
(1) Align the molding (A) to the upper ends of the windshield glass (C).
(2) Attach the molding from the upper corners towards the center.
(3) Attach the molding from the upper corners downward.
(4) Firmly apply the double sided tape (B) of the molding evenly to the end face of the glass.
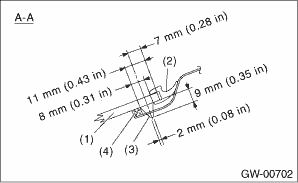
7. Apply the seal to the molding
|
(1) |
Locating pin |
|
(2) |
Dam rubber |
|
(3) |
Seal |
|
(4) |
Molding |
|
(5) |
10 mm (0.39 in) |
|
(6) |
1.5 mm (0.06 in) |
|
(7) |
Adhesive |
NOTE:
Apply so that the seal does not overlap out to the adhesive side (6).
8. Using a sponge, apply primer to the glass side and body side adhesive surfaces.
Glass primer:
Dow Automotive’s
• Betawipe VP 04604, Betaprime 5001 or equivalent
Painted surface primer:
Dow Automotive’s
• Betaprime 5402 or equivalent
NOTE:
• Primer once attached to the painted surface of the body and internal trim is hard to wipe off. Mask the circumference of such area.
• Let primer dry for about ten minutes before installing the glass.
• Do not touch the surface coated with primer.
|
(1) |
Application of primer |
|
(2) |
Glass side |
|
(3) |
Body side |
|
(4) |
Molding |
|
(5) |
Dam rubber |
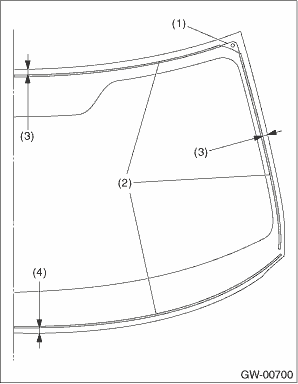
9. Apply adhesive to the glass end surface as shown in the figure.
Adhesive:
Dow Automotive’s
Gurit-ESSEX Betaseal 1502 or equivalent
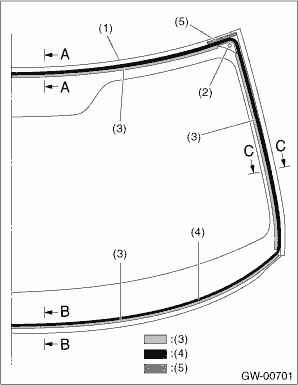
|
(1) |
Molding |
|
(2) |
Locating pin |
|
(3) |
Dam rubber |
|
(4) |
Adhesive |
|
(5) |
Seal |
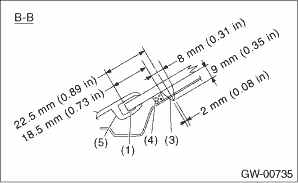

|
A-A |
Upper end area |
|
B-B |
Lower end area |
|
C-C |
Side area |
|
(1) |
Glass |
|
(2) |
Molding |
|
(3) |
Adhesive |
|
(4) |
Dam rubber |
|
(5) |
Cowl panel |
10. Using suction rubber cups, fit the locator pins into the body side, and attach the windshield glass.
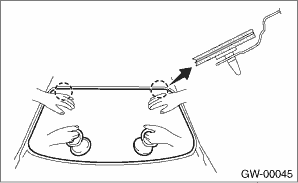
11. Lightly press the windshield glass for tight fit.
12. Make flush the adhesive surface jutted out using spatula.
13. After completion of all work, allow the vehicle to stand for about 24 hours.
NOTE:
• When door is opened/closed after glass is bonded, always lower the door glass first, and then open/close it carefully.
• Move the vehicle slowly.
• For minimum drying time and vehicle standing time before driving after bonding, follow instructions or instruction manual from the adhesive manufacturer.
14. After curing of adhesive, pour the water on external surface of vehicle to check that there are no water leaks.
NOTE:
When a vehicle is returned to the user, tell him or her that the vehicle should not be subjected to heavy impact for at least three days.
15. Install the cowl panel. 
16. Connect the wiper deicer connector. (Model with wiper deicer)
17. Install the front pillar upper trim.